How to Switch from Electric to Gas Tankless Water Heater
Switching from an electric to a gas tankless water heater can improve hot water flow, reduce long-term energy costs, and extend the lifespan of your system. Gas tankless models heat water on demand, handle higher usage, and last over 20 years with proper care. However, installation involves gas line upgrades, venting, and electrical connections, making professional help essential for safety and compliance.
Key Takeaways:
- Performance: Gas models offer higher flow rates (2–5 GPM) and are ideal for large households.
- Cost Savings: Save up to $95–$124 annually compared to electric systems.
- Installation: Requires gas line upgrades, venting, and permits. Professional installation is highly recommended.
- Maintenance: Gas systems need more upkeep, including annual inspections.
If you're ready to upgrade, ensure your home meets gas supply, venting, and water pressure requirements. Professional water heater installation services ensure safe and code-compliant installation.
Tank to Tankless Water Heater Transition – DYI Beware
Safety Requirements and Building Codes
Upgrading your water heater means following safety standards and meeting local building codes. If you’re switching from an electric to a gas tankless water heater, you’ll need to handle gas, electrical, and venting systems with care. It’s also essential to review local code requirements before starting.
Local Code Compliance
In Miami-Dade County, permits are usually required to ensure your project aligns with building codes and local regulations.
The Floridabuilding, Plumbing outlines the rules for water heater materials, design, and installation. For gas-fired units, the Florida Building Code, Fuel Gas also applies. If you’re considering a DIY approach, check the county’s Permit Exemption guidelines to see if a plumbing permit is necessary for your specific project.
Keep in mind that any work done without proper inspection approval might need to be reopened for inspection later. For detailed guidance, contact the Miamidade. If you’re in Miamibeachfl, refer to their Interactive Permit Guide for localized information.
In addition to permits, adhering to strict safety protocols is non-negotiable.
Safety Guidelines
Working with gas lines involves serious risks and should not be taken lightly. Natural gas leaks can result in explosions, fires, or carbon monoxide poisoning, making this type of project particularly hazardous for those without professional experience.
Before starting any work, shut off the main gas supply by contacting your gas utility. Never attempt to work on pressurized gas lines.
For electrical safety, disconnect the 240-volt wiring by switching off the circuit breaker and confirming with a voltage tester.
Proper venting is critical for gas units to avoid carbon monoxide buildup. Always follow the manufacturer’s instructions and local code requirements for vent sizing.
When connecting water and gas lines, use the correct compounds or Teflon tape and fittings. Test for leaks using soapy water or a gas detector to ensure everything is secure.
For peace of mind, professional installation is recommended. Hernandez Plumbing advises hiring licensed technicians who are familiar with Miami-Dade County codes. Their expertise and tools can ensure your water heater conversion is done safely and meets all local standards, protecting both your family and your property. For more information, you can visit their website at (tel:305-428-3782).
Required Tools and Materials
Before diving into a tankless water heater installation, make sure you’ve gathered all the necessary tools and materials. This project involves working with gas lines, water connections, electrical systems, and venting, so being well-prepared will save you time and ensure a smoother process. Once your tools and components are ready, double-check that your system meets the installation requirements.
Tools and Materials List
Essential Tools
Here are the tools you’ll need to get started:
- Pipe wrenches and adjustable wrenches for gas and water connections
- Voltage tester to ensure safe electrical disconnection
- Manometer for measuring gas pressure
- Drill/driver for mounting
- Keyhole saw for cutting vent openings
- Hand truck for removing the old unit
- Wire strippers and screwdrivers
- Tape measure
- Tube cutter and soldering torch for working with copper pipes
Gas Line Materials
For gas connections, specific materials are required. Use solid steel pipes or soft copper with flare fittings. Keep in mind that tankless units typically need a 3/4-inch gas line, unlike the 1/2-inch line used for older models. As Shawn Marshall from Navien Inc.’s East Coast Training Academy puts it:
"The difference in gas line sizes is the difference between drinking a milkshake with a narrow straw or a wide straw."
Be sure to include shut-off valves, sediment traps, and gas-rated thread tape in your materials. Avoid using regular plumber’s tape on gas lines – only products rated for gas should be used.
Water Line Components
For the water connections, you’ll need copper tubing, ball valves, and water heater connectors. Additional components like copper adapters, plastic-lined nipples, and copper slip couplings will ensure secure connections. Don’t forget a pressure relief valve (required by code), a discharge pipe, pipe thread compound, and Teflon tape for sealing.
Venting System
Proper venting is crucial for gas tankless heaters. Condensing units typically use PVC pipes and glue, while non-condensing models require metal vent pipes, elbows, and caps. If moisture removal is necessary, you may also need a condensate pump.
Safety and Testing Materials
Once everything is connected, you’ll need tools to test for safety. Keep a leak detection solution handy to check all gas connections. Additionally, have pipe joint compound and extra solder available for threaded and copper pipe connections.
System Requirements
With your tools and materials ready, confirm that your system can handle the demands of a gas tankless water heater.
Gas Supply Capacity
Tankless water heaters require significantly more gas than traditional models. While older tank heaters use 30,000–40,000 BTUs, tankless units often need 150,000–200,000 BTUs or more. This increased demand usually means upgrading to a 3/4-inch gas line, especially for longer runs.
"When builders and remodelers specify tankless water heaters for their projects, installers must factor in pressure, volume, and pipe size and length, among other considerations, to ensure the unit operates at peak performance."
- Shawn Marshall, Navien Inc.’s East Coast Training Academy
Undersized gas lines can cause poor performance, corrosion, toxic fumes, or gas shortages. Contact your gas utility to confirm your meter can handle the increased load.
Venting Requirements
Gas tankless heaters need proper venting to safely expel combustion gases. This means installing vent pipes through an exterior wall or the roof, with the size and configuration matching the manufacturer’s specifications. Condensing units often vent through PVC, while non-condensing models require metal venting systems.
System Performance Requirements
Tankless units rely on adequate water pressure to function. Most models need at least 15–20 PSI to activate. If your home has low water pressure, you may need to install a pressure-boosting system. Additionally, even gas-powered units require electricity for ignition, digital controls, and sometimes built-in circulation pumps. A standard 120-volt outlet should be located near the installation site.
Space and Clearances
While tankless units are more compact than traditional water heaters, they still require specific clearances. Refer to the manufacturer’s manual for the minimum distances from walls, ceilings, and other equipment. Indoor units need sufficient combustion air, while outdoor units must be protected from extreme weather and freezing temperatures.
Finally, consult your local plumbing inspector before starting the installation to ensure your setup complies with all codes. If in doubt, hiring a professional installer is always a smart choice for safety and compliance.
Removing the Electric Water Heater
Before diving into this task, make sure you’ve got all the tools and safety gear you’ll need. Taking out an electric water heater involves dealing with both electrical and water systems, so it’s important to handle everything carefully to avoid shocks or water damage.
Draining the Tank
Start by turning off the circuit breaker that powers the water heater. Wait a moment, then double-check with a non-contact voltage tester to confirm the power is off.
Put on insulated gloves and protective eyewear, and keep a fire extinguisher nearby just in case.
Next, shut off the cold water supply valve, typically located on the pipe entering the top of the tank. Let the water heater cool completely before draining it to avoid burns.
Attach a garden hose to the drain valve at the bottom of the tank. Run the hose to a floor drain, an outdoor area, or a large container. To speed up the draining process, open a hot water faucet in your home to break the vacuum.
Disconnecting Water Lines and Wiring
Once the tank is fully drained and cool, it’s time to disconnect the wiring and water lines. Before you start, take a photo of the wiring setup so you’ll have a reference later. Use your voltage tester again to make sure the wires are no longer live. Taylor Freeman, a Journeyman Plumber, suggests this step to ensure the wiring can be reconnected correctly when installing the new unit.
Remove the electrical access panel (if your heater has one) and carefully disconnect the wire nuts connecting the house wiring to the water heater. Cap the house wires with new wire nuts to keep them safe. The existing electrical box and conduit are often reusable for the new tankless unit.
When disconnecting the water lines, have a bucket ready to catch any remaining water. Unscrew flexible water lines, or if you’re working with rigid pipes, use a pipe cutter to disconnect the hot and cold lines. Don’t forget to remove any discharge pipes attached to the temperature and pressure relief valves.
After all the lines and wiring are disconnected, you can remove the old heater to make way for the new installation.
If any of these steps feel overwhelming or you’re unsure about handling them, it’s a good idea to call in a professional. Hernandez Plumbing in Miami, FL, offers expert services and can ensure the job is done safely and correctly.
Installing the Gas Tankless Water Heater
With your old electric water heater removed, it’s time to set up the new gas tankless water heater. This process involves several key steps: mounting the unit, connecting gas and water lines, venting, and electrical work. Follow these steps carefully to ensure everything is installed correctly and safely.
Mounting the Unit
Start by picking the right spot for your tankless water heater. Check the installation manual for the required clearances – both horizontally and vertically. Manufacturers typically specify how far the unit should be from walls, ceilings, and other objects to allow for proper airflow and maintenance.
If you can’t find two wall studs to attach the mounting bracket, you’ll need to install a ¾‑inch plywood backing to secure the unit. Use the provided standoffs to create a gap between the heater and the wall for ventilation. Don’t forget to check that the unit is level with a bubble level. If you live in an area prone to earthquakes, use heavy-duty metal straps and lag screws to secure the heater to the wall for added safety.
Once the unit is mounted, you’re ready to connect the gas and water lines.
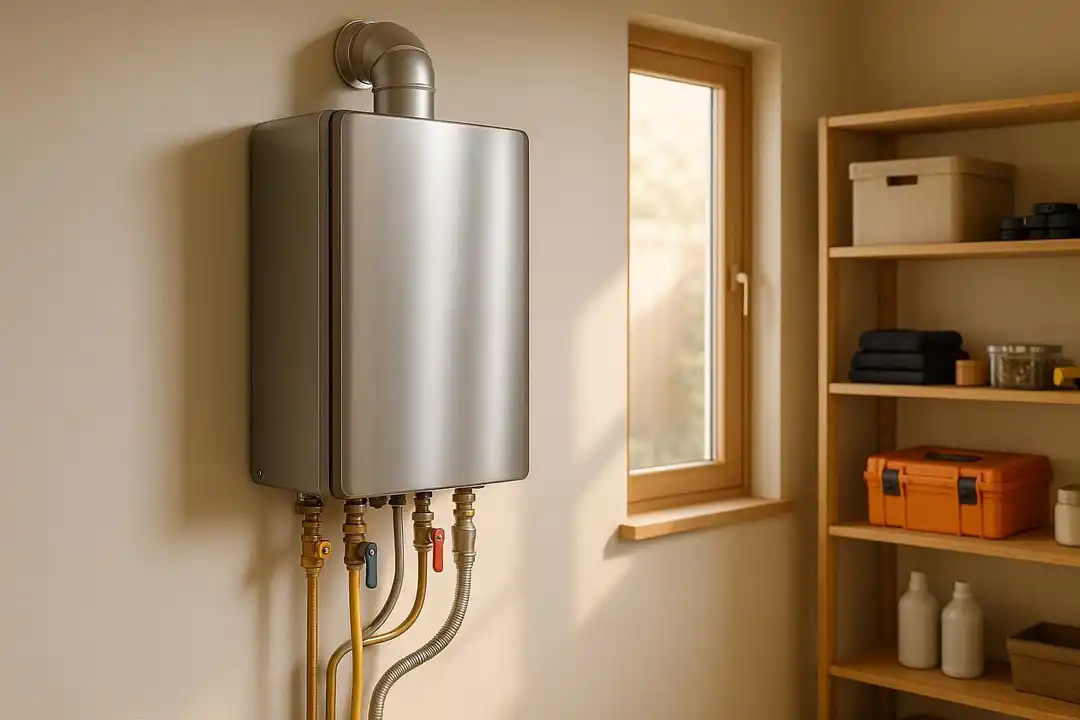
Connecting Gas and Water Lines
With the unit securely mounted, it’s time to hook up the gas and water lines. Pay close attention to the gas line connection, as tankless water heaters require higher gas flow than traditional units. Check that your gas line is the correct size for the heater’s BTU rating – most units need 1‑inch piping instead of the standard ½‑inch.
Before connecting the gas line, install a sediment trap to catch debris. Use gas-rated thread sealant and Teflon tape on all pipe threads, and tighten the fittings carefully. Once everything is connected, open the gas valve and check for leaks using a leak detection spray. If you see bubbles forming, fix the leak before proceeding.
For the water lines, start by flushing the cold water line to remove any debris from the installation process. Install shut-off valves on both the cold and hot water lines to make future maintenance easier. Use Teflon tape or pipe thread sealant on all threaded connections, tightening them securely – but not so tight that you risk damaging the fittings. Ensure your water lines are the correct size; most tankless units require ¾‑inch water lines for efficient operation.
Always confirm that your gas and water connections meet local building codes before moving on.
Venting and Electrical Connections
Proper venting and electrical connections are critical for the safe operation of your tankless water heater. Refer to the manufacturer’s manual for specific requirements. Tankless units often have different venting needs compared to traditional tank heaters. Here are the main venting options:
- Direct vents: Use separate pipes for air intake and exhaust.
- Concentric vents: Combine intake and exhaust into a single pipe.
- Power vents: Rely on indoor air for combustion but require adequate indoor ventilation.
If you have a condensing tankless unit, you might be able to use PVC for venting, as the exhaust temperatures are lower. Non-condensing units, however, typically require metal venting materials. Plan your venting system carefully, ensuring it complies with local codes and maintains the necessary clearances.
Even though the unit runs on gas, it still requires electricity for its controls and ignition. Most models need a dedicated 120‑volt circuit, though larger units may require 240 volts. Use 8‑gauge wire, and make sure any exposed wiring is properly protected, especially in areas like under sinks.
Before turning the system on, double-check that your installation meets local codes or, if none are specified, national standards such as the National Fuel and Gas Code (ANSI Z223.1/NFPA 54). Keep the manufacturer’s support number handy, as well as the installation specifications, in case you need to address any questions during inspections.
If any part of this project feels too complex – especially gas connections or venting – it’s best to call a professional. Companies like Hernandez Plumbing in Miami, FL, specialize in tankless water heater installations and can ensure everything is done safely and up to code.
Testing and Final Inspection
After installing your new gas tankless water heater, it’s crucial to test it thoroughly to ensure it’s operating safely and efficiently.
System Startup
Start by restoring the water supply. Open multiple hot water faucets and let them run until the water flows steadily without air bubbles. Next, open the gas supply valve – but avoid using an open flame to check for leaks. If you detect a gas odor, immediately shut off the gas supply and ventilate the area.
Reconnect power to the unit and double-check all electrical connections, as the heater’s controls rely on electricity. Follow the startup procedure outlined in your manufacturer’s manual. Typically, this involves powering on the unit, setting the desired temperature (commonly between 120°F and 140°F), and turning on hot water taps to ensure the system ignites correctly.
Once the unit is operational, proceed to inspect for leaks and evaluate its overall performance.
Leak Detection and Performance Check
Use a soap solution to check all gas connections for leaks. Combine dish soap with water in a spray bottle and apply it to the connections and joints. If bubbles form, there’s a leak that needs immediate attention. Shut off the gas supply and secure the connection before retesting.
Inspect the plumbing connections for water leaks while the system is pressurized and running. Even small leaks can lead to long-term damage and may indicate improper installation.
To test performance, run hot water at multiple fixtures. Use a digital thermometer to confirm that the output matches your set temperature and that the water heats consistently. Observe the burner to ensure it ignites smoothly whenever hot water is activated. Additionally, check the venting system to confirm that exhaust is expelled properly, without backdrafts or unusual odors entering your home. The unit’s display should show normal operation with no error codes or warning lights. If any error messages appear, refer to the troubleshooting guide in your manual.
Issues like ignition failure, inconsistent water temperatures, or persistent error codes may stem from trapped air in the gas line, incorrect flow rates, or improper settings. Try purging the gas line again or adjusting the water flow. If the problem persists, consult a licensed professional.
In many areas, a final inspection by a licensed professional or municipal inspector is required before using the system. Even if it’s not mandatory in your location, having a professional review your installation can provide extra peace of mind. For example, companies like Hernandez Plumbing in Miami, FL, offer inspection services to ensure your setup complies with safety standards and local regulations.
Finally, document your test results and keep them with your installation manual. This record will be helpful for warranty claims and future maintenance. After a few days of use, recheck all connections to confirm their stability over time.
Electric vs Gas Tankless Water Heaters Comparison
When deciding between electric and gas tankless water heaters, it’s essential to weigh the key differences to determine which system fits your household’s specific needs.
Energy Efficiency
Electric models are highly efficient, converting over 98% of energy into heat. Gas units, on the other hand, lose some energy to venting, achieving efficiency rates below 85%.
Flow Rate and Hot Water Delivery
Gas heaters typically provide higher flow rates, delivering 2–5 gallons per minute, making them well-suited for larger households. Electric units, with lower flow rates of about 1–3 gallons per minute, are better for smaller households or limited hot water demands.
Operating Costs
Even though electric units are more efficient, natural gas tends to be less expensive than electricity in many areas, which can result in lower monthly operating costs for gas systems.
Installation Complexity and Costs
Electric tankless water heaters are easier to install, requiring no venting, and are generally more affordable upfront. Unit costs range from $600 to $1,000, with total installation costs between $1,400 and $3,000. Gas systems, however, often need upgrades like gas lines and venting, which increases both complexity and cost. Gas units range from $1,000 to $2,600, with total installation costs falling between $2,100 and $5,600.
Maintenance Requirements
Gas systems require more upkeep, including annual inspections due to their combustion components. Electric models demand less frequent maintenance, though both types benefit from annual flushing to maintain performance.
Comparison Table
Here’s a quick breakdown of the main differences between electric and gas tankless water heaters:
| Feature | Electric Tankless | Gas Tankless |
|---|---|---|
| Energy Efficiency | Over 98% | Under 85% |
| Flow Rate | 1–3 GPM | 2–5 GPM |
| Unit Cost | $600–$1,000 | $1,000–$2,600 |
| Total Installation Cost | $1,400–$3,000 | $2,100–$5,600 |
| Installation Complexity | Simple – no venting needed | Complex – requires gas lines and venting |
| Operating Costs | Higher in many regions | Lower in many regions |
| Maintenance Frequency | Less frequent | Annual inspections |
| Lifespan | 15–20 years | 20+ years |
| Best For | Small households, low demand | Large households, high demand |
Choosing the Right System for Your Home
For households with heavy daily hot water use, a gas tankless water heater is often the better option, thanks to its ability to maintain consistent flow rates. Gas systems also shine in high-demand situations, such as homes using around 86 gallons of hot water per day. On the other hand, homes with lower usage – about 41 gallons or less per day – can benefit from the energy efficiency of tankless systems, with savings of 24–34% compared to conventional storage tanks.
Use these insights to make an informed decision that aligns with your household’s hot water needs.
Conclusion and Next Steps
Now that we’ve gone through the installation process step by step, let’s recap the advantages and discuss what comes next.
Switching from an electric to a gas tankless water heater offers several perks, including faster heating, higher flow rates for larger households, and up to 34% better energy efficiency. Beyond improved performance, this upgrade ensures compliance with the safety and code standards we’ve covered.
The conversion process involves removing your old electric system, installing gas lines, setting up proper venting, and reconnecting electrical components. This isn’t a DIY project – it requires skilled professionals with expertise in plumbing, gas fitting, and electrical work to ensure everything is done safely and meets local codes. For homeowners in Miami, licensed experts like those at Hernandez Plumbing provide services that prioritize safety, compliance, and customer satisfaction, with upfront pricing and same-day availability.
Investing in professional installation pays off with better energy efficiency, consistent hot water, and lower utility bills. With the right care and maintenance, your new gas tankless water heater can deliver dependable service for many years to come.
If you’re ready to make the switch, reach out to a licensed professional today to start planning your upgrade to a gas tankless system.
FAQs
What are the advantages of switching from an electric to a gas tankless water heater?
Upgrading to a gas tankless water heater can bring several advantages to your home. These systems are known for their ability to deliver higher flow rates, making it easier to meet multiple hot water demands at the same time. This is especially helpful for larger households where showers, laundry, and dishwashing often overlap. Plus, gas models heat water more efficiently, ensuring you always have hot water when you need it.
From a cost perspective, gas tankless water heaters are often more affordable to operate compared to their electric counterparts, which can lead to lower energy bills over time. On top of that, they typically last longer, meaning fewer replacements and more savings in the long run. With their blend of reliability and efficiency, switching to a gas tankless system can be a smart choice for homeowners looking to improve their hot water setup.
What safety steps should I follow when installing a gas tankless water heater, and why hire a professional?
When setting up a gas tankless water heater, safety should always come first. Start by ensuring proper venting to avoid carbon monoxide buildup. Before beginning, shut off both the gas and water supplies, and carefully follow the manufacturer’s installation instructions. Take the time to double-check gas line connections and confirm that all components comply with local building codes.
While DIY installations might seem tempting, hiring a professional is strongly advised. Professionals bring the expertise needed to handle gas lines, install proper venting, and adhere to safety standards. This minimizes risks like gas leaks, fire hazards, or carbon monoxide exposure. For those in Miami, Hernandez Plumbing provides trustworthy water heater installation services, prioritizing both safety and customer satisfaction.
What do I need to check before installing a gas tankless water heater in my home?
Before setting up a gas tankless water heater, it’s important to confirm that your home meets the essential requirements. To start, your gas supply line needs to handle at least 200,000 BTU/hour, which often means using a ¾-inch or 1-inch gas line, depending on the unit’s specifications and the distance involved. Proper venting is another key factor for both safety and efficiency. This typically requires dedicated intake and exhaust vents – usually around 3 inches in diameter – and you can’t reuse old venting systems. Lastly, make sure the installation follows the latest guidelines outlined in the Nfpa to ensure everything runs safely and efficiently. If you’re uncertain about any of these, it’s a good idea to bring in a professional plumber to evaluate your home’s setup.
Need Professional Help?
Our licensed plumbers are ready to help with your water heater services needs.