Ultimate Guide To Drainage System Pressure Testing
Drainage system pressure testing ensures your plumbing is leak-free and meets safety standards. Our professional drain cleaning and inspection services include comprehensive pressure testing to identify issues before they become major problems. Here's what you need to know:
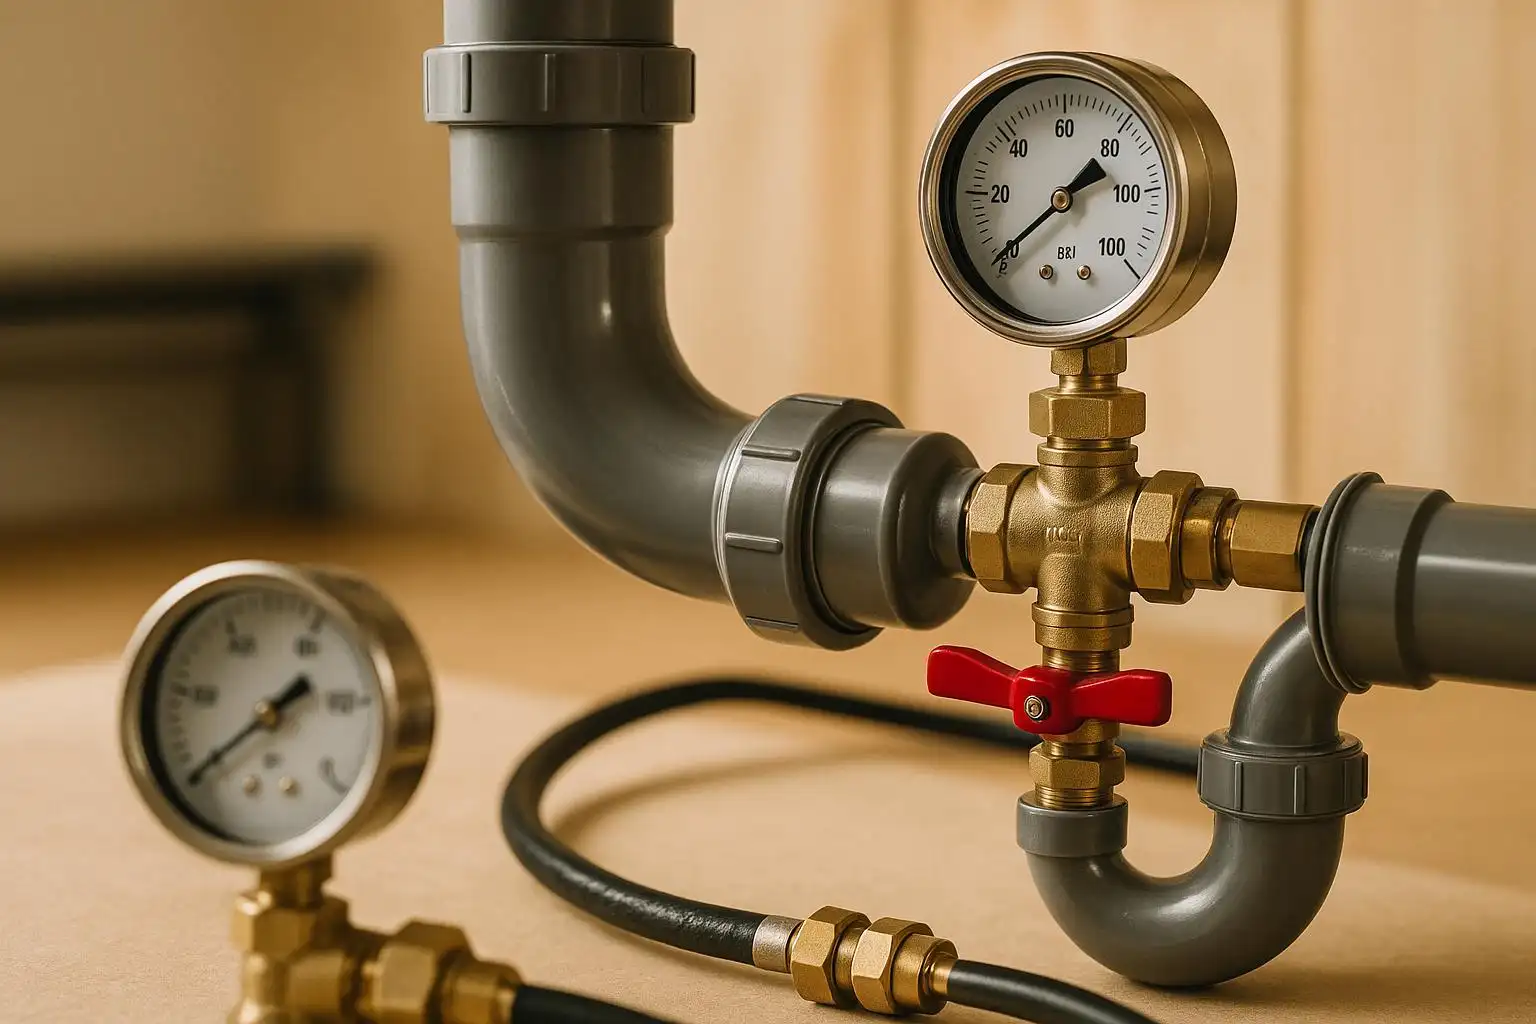
- What it is: A method to check for leaks and weaknesses using air or water pressure.
- Why it matters: Prevents costly repairs, ensures proper installation, and maintains system efficiency.
- When to test: For new installations, after major repairs, or as regular maintenance.
- Methods:
- Air testing: Quick, uses 5-10 psi, ideal for small systems or cold weather.
- Water testing: More accurate, uses 25-150 psi, best for detecting small leaks.
Key takeaway: Regular testing protects your property, saves money, and ensures compliance with local codes. For complex systems, hiring a professional ensures thorough results.
How to Pressure Test Your Underground Drainage Soil Pipes: A Step by Step Guide
Pressure Testing Methods
Now that we’ve introduced drainage system pressure testing, let’s dive into the two main methods: air pressure testing and water pressure testing (also called hydrostatic testing). Each approach has its benefits and works better in certain scenarios, depending on factors like pipe material, system size, and environmental conditions.
Choosing the right method requires understanding what each test offers and how it fits your specific needs. Below, we break down each method’s process, tools, and best uses.
Air Pressure Testing
Air pressure testing relies on compressed air to pressurize the system, making it ideal for smaller residential setups or areas where water isn’t a practical option. The process involves sealing all system openings and introducing compressed air at a set pressure, usually between 5 and 10 psi, which is sufficient for most residential drainage systems.
The biggest advantage of air testing is its speed and ease. Most tests can be completed in under 30 minutes, and because no water is involved, there’s no need for draining or concerns about freezing temperatures. This makes it especially handy during winter months when water testing might risk frozen pipes.
Air testing is excellent for spotting major leaks. If there’s a significant issue, the pressure gauge will show an immediate drop, pinpointing the problem quickly. It’s also well-suited for systems designed to carry air or gas, such as certain vent lines.
Water Pressure Testing (Hydrostatic Testing)
Water pressure testing involves filling the drainage system with water and pressurizing it to specific levels. This method typically operates at higher pressures than air testing, ranging from 25 to 150 psi, depending on system requirements and local codes.
Hydrostatic testing mimics real-world conditions, making it ideal for systems that will ultimately carry water. It provides a more accurate representation of how the system will perform under normal use.
One of the key strengths of water testing is its ability to detect even tiny leaks that air testing might miss. Water molecules are larger than air molecules, so small openings that might not show up during air testing often become apparent with water. This makes hydrostatic testing the go-to method for critical systems where pinpoint leak detection is essential.
However, water testing does have its downsides. It takes longer to set up and clean up, as the system must be completely filled and then drained. There’s also a risk of water damage if a major leak is discovered during testing, and it’s not practical in freezing conditions unless precautions are taken.
Air vs. Water Testing Comparison
Here’s a quick comparison of the two methods:
| Factor | Air Pressure Testing | Water Pressure Testing |
|---|---|---|
| Setup Time | 15-30 minutes | 45-90 minutes |
| Test Pressure | 5-10 psi | 25-150 psi |
| Leak Detection | Good for large leaks | Excellent for all leak sizes |
| Weather Limitations | None | Not suitable for freezing conditions |
| Cleanup Required | Minimal | Complete system drainage |
| Cost | Lower | Higher due to water use and time |
| Accuracy | Good for major issues | Superior for detailed testing |
| Best Applications | Small residential systems, quick checks | Large systems, precise leak detection |
The decision between air and water testing depends on the system and the task at hand. For smaller residential systems or quick maintenance checks, air testing is a fast, cost-effective option. On the other hand, for new installations, major repairs, or when accuracy is critical, water testing is the better choice.
In practice, professionals often use both methods – air testing for initial checks and hydrostatic testing for final confirmation. This combination ensures both efficiency and precision.
Step-by-Step Procedures and Required Tools
Using the correct tools and following proper procedures is essential for conducting accurate pressure tests.
Tools and Equipment Needed
To perform air and water pressure tests, you’ll need specific tools tailored to each method. Here’s what you’ll need:
For air pressure testing:
- An air compressor to provide the necessary compressed air.
- A pressure-test gauge to monitor the system’s pressure levels.
- Basic hand tools like pliers and plumber’s tape to ensure watertight seals.
- DWV test plugs and caps (½-inch and ¾-inch) compatible with copper, PEX, or brass fittings.
- Connection hardware, including pipe nipples (½-inch and ¾-inch), a pipe coupling, and a reducer to accommodate different pipe sizes.
For water pressure testing:
- A hand pump for pressurizing the system when municipal water pressure isn’t sufficient.
- Pressure-rated hoses designed to handle the required testing levels safely.
- Calibrated pressure gauges for accurate monitoring.
- Padlocks and chains to secure valves during the test.
- Plumbing plugs or inflatable plumbing balloons to seal drains and other openings.
- A garden hose for filling the system gradually with water.
Once you’ve gathered the necessary tools, follow the outlined procedures to carry out the tests effectively.
Air Pressure Testing Steps
- Seal all openings: Use plastic pipe cement to cap all stub-outs. These caps create a tight seal and can be removed after testing.
- Set up the gauge and compressor: Attach a tee fitting and adapter to a cleanout fitting. Use plumber’s tape to ensure a secure, watertight connection for the pressure gauge and compressor hose.
- Pressurize the system: Turn on the compressor and bring the system to approximately 5 PSI. This level is generally safe for most residential drainage systems.
- Check for leaks: Monitor the initial pressure for a few minutes. Any sudden drops in pressure could indicate a leak.
- Observe the system: Let the system sit for about 15 minutes while keeping an eye on the pressure gauge. A steady drop during this time signals a potential problem.
- Air test for water supply plumbing: Close all water supply valves, including the main line, to prevent interference. Cap all supply lines except for shower faucets, using plumber’s tape on threaded fittings for a tight seal.
Water Pressure Testing Steps
- Seal all openings: Use appropriate plugs or inflatable balloons to close off all system openings. Ensure each seal can handle the test pressure.
- Fill the system with water: Slowly fill the system using a garden hose or a suitable water source. Start from the lowest point and work upward, releasing trapped air from the highest openings before sealing them.
- Pressurize the system: Use municipal water pressure or a hand pump to pressurize the system. Most drainage systems require pressures between 25 and 150 PSI – check local codes and system specifications for guidance.
- Monitor pressure levels: Keep an eye on water levels and pressure throughout the testing period. While slight variations are normal as the system settles, a consistent pressure drop indicates a leak.
- Drain the system post-test: Once testing is complete, drain the system fully to prevent freezing damage and remove any debris that may have entered during the process.
Safety Precautions
- Avoid over-pressurization: Exceeding recommended pressure levels can damage pipes and fittings, leading to costly repairs and safety risks.
- Manage water spills: Keep absorbent materials on hand to clean up spills, and ensure electrical equipment and outlets remain dry.
- Follow equipment guidelines: Use pressure testing tools as directed by the manufacturer to avoid injuries from sudden pressure releases or equipment malfunctions.
- Wear safety gear: Protect yourself by wearing safety glasses and work gloves during the testing process.
- Never leave the system unattended: Always have someone nearby to monitor the test and shut it down if needed.
- Check the weather: Avoid water pressure tests in freezing conditions, as expanding water can damage pipes.
Troubleshooting and Reading Test Results
Once you’ve completed the pressure test procedures, the next step is to interpret the results. This process is key to identifying leaks and confirming that the system is functioning properly.
How to Read Test Results
For water pressure tests (also known as hydrostatic testing), the system fails if the water level in the drain lines drops during the test. This drop indicates the presence of a leak. If the water level remains steady, the system is leak-free. A sharp drop in water level points to a significant leak, while a slower drop suggests a smaller issue.
When testing air pressure, a slight and gradual drop might be normal. However, a loss of 5 PSI over three days typically signals a leak. Ideally, a drainage system should maintain pressure without any loss, aside from minor fluctuations caused by temperature changes.
If a leak is detected, the next step is to locate it using isolation testing.
Isolation Testing for Leak Localization
Isolation testing is an effective way to find the exact source of a leak. This involves dividing the system into smaller sections and testing each part individually until the leak is identified. Once repairs are made, retest the system to ensure all leaks have been resolved.
Professional Services and Local Expertise
While DIY testing can work for straightforward systems, more complex setups often require the skills of licensed professionals. They can save you time, money, and help you avoid unnecessary complications.
When to Call a Professional
For larger or more intricate systems – like those in multi-story buildings, underground networks, or properties with numerous connections – professional intervention is essential. These systems often operate under higher pressure and stricter safety standards, which demand specialized tools and expertise that only trained professionals can provide.
If your system keeps failing pressure tests even after repairs, it could signal deeper issues like structural damage, faulty installation, or code violations. Professional plumbers have advanced diagnostic tools and the experience to uncover hidden problems that might not be immediately obvious.
Regulatory compliance is another key reason to involve professionals. For new builds, major renovations, or commercial properties, meeting local building codes and passing inspections is non-negotiable. Experienced plumbers are familiar with codes like the Codes Iccsafe, ensuring your system is up to standard.
Safety risks also make professional testing a safer choice. High-pressure testing in older systems or those with unknown conditions can be dangerous. Licensed plumbers follow strict safety protocols and carry insurance to protect both property and people during the process.
Given these complexities, partnering with a skilled professional for your pressure testing needs is a smart decision.
Why Choose Hernandez Plumbing?
For pressure testing challenges, Hernandez Plumbing brings unmatched local expertise. Their team is well-versed in South Florida’s unique conditions and local codes, offering services that ensure accurate and compliant results.
Their advanced diagnostic tools allow for precise detection of leaks and weaknesses, helping to identify potential issues before they escalate. This thorough approach not only resolves current problems but also helps prevent future ones.
With 24/7 emergency services, Hernandez Plumbing is ready to assist whenever issues arise. Quick action during emergencies can minimize damage, protecting your property from prolonged water-related issues.
Transparency is another hallmark of their service. Upfront pricing and a satisfaction guarantee mean you’ll know the cost before work begins, and the guarantee ensures the job meets high professional standards. This clarity is especially important for pressure testing, where hidden complications can sometimes expand the scope of work.
Hernandez Plumbing also offers end-to-end solutions. From initial testing to final repairs, their team handles everything. If leaks or system defects are uncovered during testing, they can address them promptly, eliminating the need to juggle multiple contractors. This streamlined process saves time and ensures consistent quality from start to finish.
Conclusion
Ensuring a proper drainage system through pressure testing is a key step in maintaining a reliable plumbing setup. Whether you’re dealing with new installations, routine maintenance, or troubleshooting, understanding the basics of air and water pressure testing helps keep your system running smoothly and compliant with local building regulations.
When it comes to choosing a testing method, the decision should depend on your specific system requirements. Air pressure testing is quick and convenient, making it a popular choice for residential systems. On the other hand, hydrostatic testing is ideal for critical applications where pinpointing leaks with precision is crucial.
A system that holds pressure within acceptable ranges signals proper installation and overall integrity. However, if pressure drops occur, they indicate potential issues like faulty connections, damaged pipes, or installation mistakes that require immediate attention. The troubleshooting techniques outlined here can help you identify and address these problems effectively.
For more complex systems or situations, hiring a licensed plumber can make all the difference. Professionals bring specialized tools, in-depth experience, and a thorough understanding of local codes. Not only can they ensure your testing meets all requirements, but they can also resolve any issues uncovered during the process, providing end-to-end solutions.
Take Hernandez Plumbing, for example. Their advanced diagnostics, round-the-clock availability, and transparent pricing simplify the pressure testing process. If testing uncovers problems, their team is equipped to handle repairs on the spot, saving you time and hassle. This all-in-one approach not only confirms system reliability but also protects your investment.
Regular pressure testing is a proactive way to safeguard your property and ensure your drainage system performs reliably over the long term. By following proper procedures and knowing when to call in the experts, you can enjoy a system that operates efficiently for years to come.
FAQs
What are the pros and cons of using air pressure testing versus water pressure testing for my drainage system?
Air pressure testing stands out for being faster, less expensive, and easier to set up because it doesn’t involve water. This makes it a practical choice for smaller or less complex drainage systems. However, it’s not without drawbacks – its reliability in detecting leaks can be questionable, and the use of compressed air poses safety risks if not handled properly.
On the other hand, water pressure testing, though more time-intensive and costly, is typically safer and delivers more precise results. This method is often preferred for larger or more intricate systems where pinpointing leaks accurately is crucial.
When should I hire a professional for drainage system pressure testing instead of trying it myself?
If you’re dealing with slow drainage, mysterious odors, water stains on your walls or ceilings, or puddles forming around your property, these could be red flags signaling trouble with your drainage system. Such issues often stem from more serious problems like damaged pipes, debris buildup, or even ground shifting – problems that a quick DIY fix likely won’t solve.
Calling in the pros ensures an accurate diagnosis and a solution that lasts, saving you from wasting time and potentially expensive repairs later. If you’re in Miami, FL, Hernandez Plumbing is a trusted option. Their team specializes in everything from leak detection to drain cleaning, offering upfront pricing and a satisfaction guarantee to give you peace of mind.
What safety precautions should I follow when pressure testing a drainage system at home?
When testing the pressure of a drainage system, put safety at the forefront. Equip yourself with the right protective gear – gloves, safety glasses, and a hard hat – to shield against unexpected leaks or potential pipe failures. Before diving into the process, confirm the system is fully drained, and release any leftover pressure to avoid sudden bursts.
As you conduct the test, keep a close eye on the pressure gauge and stick to the recommended pressure level – typically around 45 psi for most systems. Double-check that all connections are securely sealed to minimize the risk of leaks. Carefully inspect the system throughout the test to catch any issues early. If you’re uncertain about any step, don’t hesitate to reach out to a professional to ensure everything is handled safely and correctly.
Need Professional Help?
Our licensed plumbers are ready to help with your drain cleaning needs.