How to Stop Water Leaks Temporarily
Water leaks can cause serious damage fast – mold can grow within 48 hours, leaks waste up to 90 gallons daily, and repairs often exceed $11,000. Acting immediately can save your home from costly damage. For serious leaks, professional leak detection and repair services are essential. Here's how to temporarily stop leaks:
- Shut off water: Locate and turn off the main valve. Test faucets to ensure water is off.
- Ensure safety: Turn off electricity near pooled water and wear gloves/shoes to avoid hazards.
- Dry and prep: Clear the area, dry the pipe, and gear up with gloves, towels, and lighting.
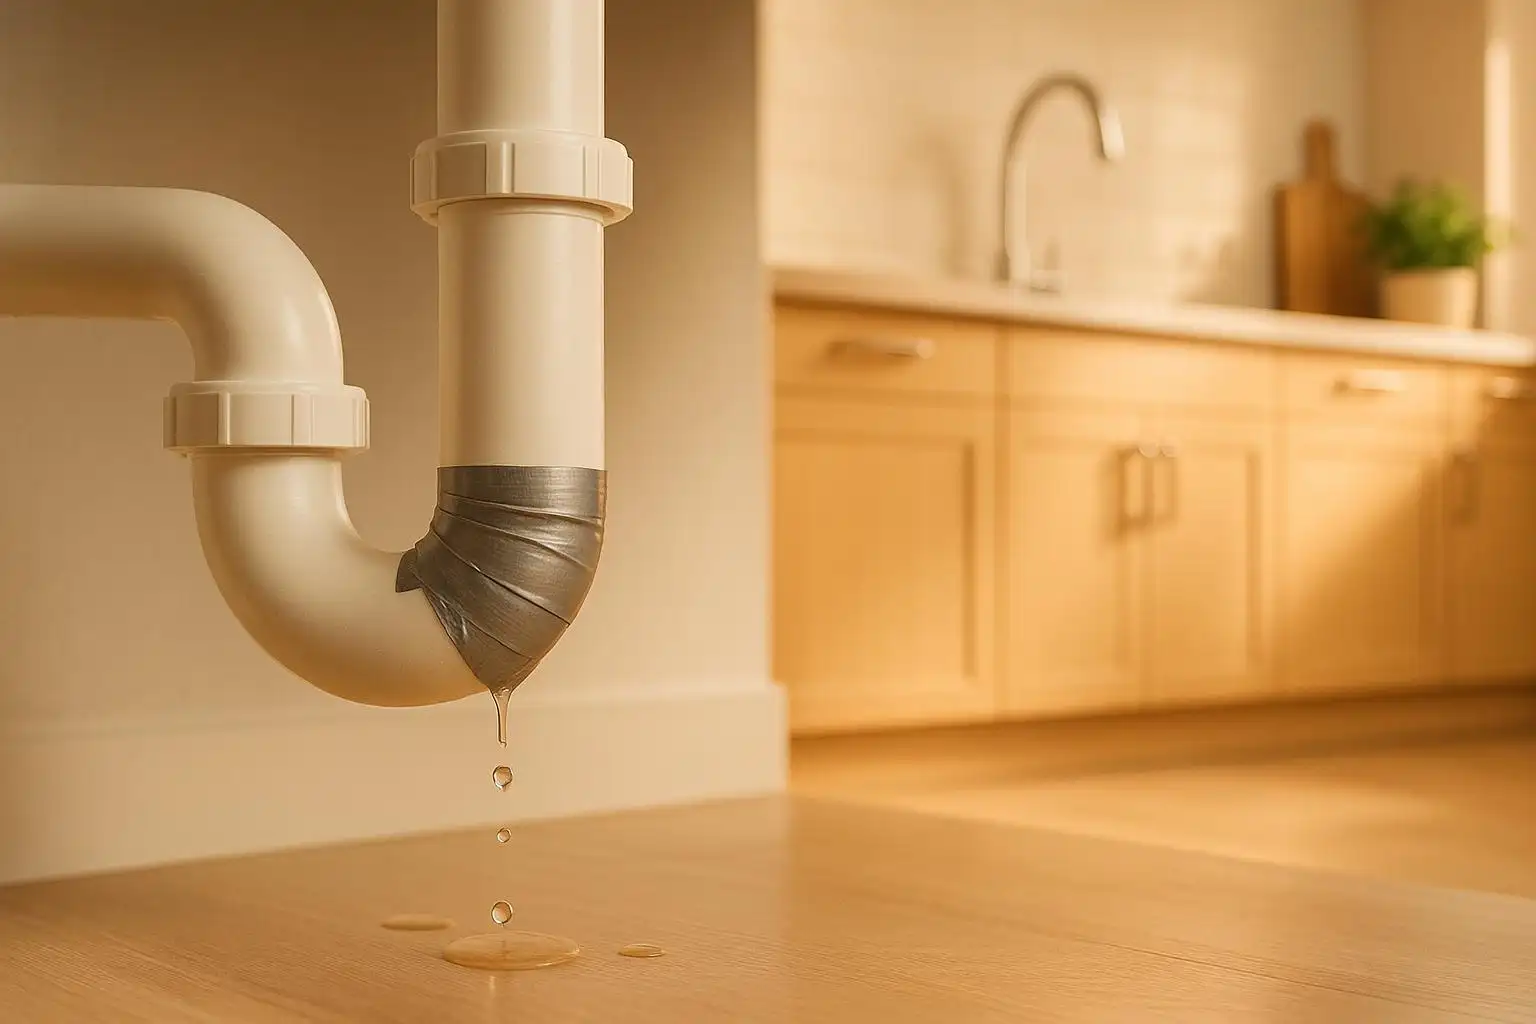
- Temporary fixes: Use pipe clamps, silicone tape, epoxy putty, or rubber patches to seal leaks.
These solutions buy time until professional repairs are possible. For severe or recurring issues, contact a plumber for a permanent fix.
How to Stop a Leaking Water Pipe – FAST!
Water Leak Basics and First Safety Steps
When dealing with a water leak, the first step is figuring out what you’re up against. Is it a burst pipe, a corroded joint, a loose fitting, or something else? Once you’ve identified the type of leak, it’s time to act quickly – while keeping safety top of mind. Remember, water and electricity don’t mix, and even clean water can become unsafe over time. Taking the right precautions early on helps protect you, your home, and your repair efforts.
Turn Off Your Main Water Valve
The most critical step? Stop the water flow immediately. Locate your main water valve, typically found near the water meter or in the basement. If it’s a wheel valve, turn it clockwise (think "righty tighty") until it stops. For a lever valve, rotate it 90° to shut off the water supply.
Once you’ve turned the valve, test to make sure the water is off by turning on a faucet in your home. If water still trickles out, you might have additional shutoff points or a partially stuck valve. Check for local shutoff valves near sinks, toilets, or water heaters if the main valve isn’t doing the job.
If the main valve is stuck or won’t budge, avoid forcing it – it could break and make matters worse. Instead, contain the leak with towels or buckets and call a professional plumber for assistance.
Stay Safe Around the Leak Area
Turn off the electricity in any area where water has pooled or is spreading. Water conducts electricity, so it’s essential to shut off the circuit breaker for the affected zone. Avoid touching wet surfaces and wear rubber-soled shoes for added protection.
Inspect for structural damage, such as sagging ceilings, bulging walls, or soft spots in the floor. These could collapse unexpectedly. If you notice severe damage, evacuate the area and contact professionals immediately. Temporary fixes won’t help if the structure is compromised.
Protect yourself from potentially contaminated water. Leaks from supply lines usually involve clean water, but drain line leaks can carry harmful bacteria or chemicals. Wear gloves when handling any leaked water, and wash your hands thoroughly afterward. If the leak involves sewage or drain water, treat it as hazardous and minimize your exposure.
Get the Area Ready for Repairs
Before jumping into repairs, clear the area around the leak and thoroughly dry the pipe using towels or a fan. A dry surface is crucial for repair materials to stick properly.
Gear up for safety. Wear protective gloves and safety glasses to shield yourself from sharp edges, pipe fragments, or chemicals. If you’re working in tight spaces like under a sink or in a crawl space, knee pads and a headlamp can make the job easier and safer.
Set up proper lighting. Good visibility is key to pinpointing the exact source of the leak and assessing the damage. A flashlight or work light will help you see clearly and apply your repair materials accurately. Poor lighting can lead to incomplete fixes that won’t hold up.
Prepare for cleanup. Keep extra towels, a mop, and buckets handy to manage any remaining water. Even with the main valve off, some water will still drip from the pipes. Staying organized and prepared can prevent further damage and keep the area under control.
Once you’ve completed these steps, you’re ready to gather the tools and materials needed for a temporary fix.
Tools and Materials You Need for Temporary Repairs
When water starts leaking, quick action can save your home from further damage. Having the right tools and materials on hand can make all the difference between a manageable fix and a chaotic flood. Most temporary repairs rely on basic household tools, but the exact materials you’ll need depend on your pipe type and the severity of the leak. Here’s a rundown of the essentials to keep on hand for emergencies.
Basic Repair Tools and Supplies
To handle most leaks, stock up on these essential tools and supplies:
- Pipe clamps: These adjustable metal bands are lifesavers for sealing holes up to 1/4 inch in diameter. Opt for stainless steel clamps to avoid rust and keep a variety of sizes (1/2 inch to 4 inches) on hand. They’re affordable too, usually costing $3-8 each.
- Pipe wrap tape: Silicone self-fusing tape is a top choice for emergency repairs because it bonds to itself without adhesive and works on wet surfaces. Stretch it to double its length while wrapping for maximum grip. Rubber pipe tape is another solid option, offering a waterproof seal for about $5-10 per roll. Even duct tape can work temporarily in a pinch.
- Epoxy putty: This two-part putty hardens quickly – within 10-15 minutes – and forms a strong seal that can handle up to 150 PSI. Knead it until the color is uniform, press it over the leak, and use wet hands to prevent sticking.
- Plumbing putty: Unlike epoxy, plumbing putty stays flexible, making it perfect for temporary fixes around joints and fittings. It’s easy to remove when you’re ready for permanent repairs.
- Rubber pads or gaskets: These work with pipe clamps to create watertight seals. You can cut them from old inner tubes or rubber mats, aiming for thickness around 1/8 inch to ensure proper compression.
Beyond these, keep tools like adjustable wrenches (10-inch and 12-inch), pipe wrenches, and screwdrivers for tightening clamps and removing damaged fittings. A utility knife is handy for cutting tape or rubber, while sandpaper or a wire brush preps pipe surfaces for better adhesion. Don’t forget basics like buckets, towels, plastic sheeting, and a flashlight or headlamp for working in dark spaces.
Matching Materials to Your Pipe Type
Different pipe materials call for specific repair approaches. Here’s how to handle the most common types:
- Copper pipes: These work well with most repair methods. Epoxy putty adheres strongly to their smooth surface, and pipe clamps distribute pressure evenly without denting. Before sealing, clean the pipe with fine sandpaper to remove oxidation.
- PVC pipes: Since PVC expands and contracts with temperature changes, flexible materials like silicone tape or rubber gaskets are best. Be cautious with epoxy putty, as it may crack if the pipe shifts. Tighten clamps gently to avoid damaging the plastic.
- PEX pipes: These flexible pipes can be tricky because adhesives may slip on their smooth surface. Lightly roughen the area with sandpaper before applying putty or tape. Use rubber padding with clamps to prevent cutting into the pipe.
- Cast iron pipes: Often found in older homes, these pipes typically have rough, corroded surfaces. Use a wire brush to remove rust and debris before applying repair materials. The rough texture helps epoxy putty stick better, but you may need extra material to fill uneven spots.
- Galvanized steel pipes: These pipes are prone to internal corrosion, so even a small leak could signal bigger problems. Use pipe clamps with wide rubber gaskets to distribute pressure over potentially weakened areas. Temporary fixes here are just that – temporary.
Water Pressure and Temperature Considerations
Your home’s water pressure and temperature also play a role in choosing repair materials. For high-pressure systems (above 60 PSI), stronger solutions like metal pipe clamps with thick rubber gaskets are essential. Lower-pressure systems can often be managed with tape and putty. You can check your water pressure using a gauge, available at most hardware stores for under $15.
For hot water lines, make sure to use heat-resistant materials. Silicone tape, for example, can handle temperatures up to 400°F, while standard duct tape may melt around 200°F. Always turn off the water heater and let the pipes cool before starting repairs to avoid burns.
How to Fix Water Leaks Temporarily
When dealing with water leaks, the right repair method depends on the size of the leak and the type of pipe. Each approach is suited to specific situations, so choose the one that matches your needs.
Fix Leaks with Pipe Clamps
Pipe clamps are one of the most reliable temporary fixes for leaks, especially for holes up to 1/4 inch wide. They work on all pipe materials and are great for handling high water pressure.
Start by cleaning the area around the leak to remove any dirt, rust, or corrosion. Cut a rubber pad so it extends about 1 inch beyond the leak on all sides. Place the pad directly over the leak, ensuring it completely covers the damaged area.
Next, position the pipe clamp over the rubber pad. Make sure the clamp’s tightening mechanism is on the opposite side of the leak to distribute pressure evenly. Tighten the clamp until it’s snug, but avoid over-tightening, especially on PVC pipes, as too much pressure can cause cracks. Once secure, turn the water back on slowly and check for leaks. If you notice any seepage, turn off the water and tighten the clamp a bit more. Keep in mind, this is a temporary solution.
If clamps aren’t an option, consider using tape for smaller leaks.
Wrap Leaks with Pipe Tape
Pipe tape is ideal for small or pinhole leaks, especially in spaces where clamps won’t fit. Silicone self-fusing tape is a top choice because it bonds to itself and works even on wet surfaces.
Although silicone tape can be applied to wet pipes, drying the surface first helps create a stronger bond. Start wrapping the tape about 2 inches before the leak, stretching it to double its width as you go – this activates the tape’s self-fusing properties. Overlap each layer by half the tape’s width and maintain steady tension. Continue wrapping until you’re 2 inches past the leak, then reverse direction and wrap back over the first layer for added strength.
For rubber pipe tape, follow a similar process, but peel off the backing as you wrap. Press each layer firmly to eliminate air pockets that could weaken the seal. Allow the repair to set for about 30 minutes before restoring full water pressure.
If you’re in a pinch, even duct tape can work temporarily. Clean and dry the pipe thoroughly, then apply multiple tight layers of duct tape. While this won’t last as long as specialized pipe tape, it can hold for a few hours until a better fix is possible.
For a more durable solution, you can use epoxy or putty.
Seal Leaks with Epoxy or Putty
Epoxy putty provides a solid seal that can withstand high water pressure, making it a good choice for larger holes or cracks. Since it cures quickly – usually within 10-15 minutes – you’ll need to work fast.
Turn off the water and drain the pipe completely, as epoxy adheres better to dry surfaces. Clean the area around the leak and roughen it slightly to improve adhesion. Cut equal parts of the two-part epoxy putty and knead them together until the color is consistent, which typically takes 1-2 minutes.
Press the putty over the leak immediately, shaping it to extend about 1/2 inch beyond the damaged area. Use wet hands to prevent the putty from sticking to your fingers. For deeper holes, apply the putty in layers instead of trying to fill the entire gap at once. Smooth the surface and allow the putty to cure for the recommended time – usually 15-20 minutes for an initial set and about an hour for full strength. Avoid disturbing the repair during this time to ensure a strong seal.
Plumbing putty, on the other hand, remains flexible, making it a good option for temporary fixes around joints and threaded connections. Apply it similarly to epoxy putty, but remember it’s not a permanent solution.
Make a Quick Patch with Hose and Clamps
If you don’t have specialized materials, a piece of rubber hose and a couple of clamps can provide an immediate fix, especially for larger cracks.
Find a rubber hose or tubing with an inside diameter slightly larger than your pipe’s outside diameter. Garden hose, radiator hose, or thick rubber tubing from a hardware store works well. Cut a section of hose that’s 2-3 inches longer than the damaged area.
Slide the hose over the pipe so it completely covers the leak, leaving extra overlap on either side. If the hose is too tight, you can cut it lengthwise and wrap it around the pipe instead, though this creates a less secure seal.
Place hose clamps at both ends of the rubber patch, about 1/2 inch from each edge. Tighten them evenly, alternating between the clamps to prevent the patch from shifting under pressure. For split patches, add additional clamps spaced 1 inch apart. Make sure the overlapping edges of the split hose face away from the water flow to keep them from lifting under pressure.
This method can handle significant water pressure and often lasts longer than other temporary fixes. However, it’s best suited for straight pipe sections where you have enough room to position the hose properly. Like the other methods, this is a temporary fix.
When Temporary Fixes Aren’t Enough
Temporary Fixes Buy You Time
Quick fixes can help control water damage in the short term, but they’re not a substitute for proper, lasting repairs. These stopgap measures are designed to minimize the immediate impact of a leak, giving you time to arrange for professional help. However, if the leak continues or worsens, it’s a clear sign that more robust action is needed.
Warning Signs You Need a Plumber
One of the most obvious indicators that your temporary repair isn’t holding up is ongoing leakage. If water keeps dripping from the patched area or if new leaks start showing up nearby, it’s time to bring in a professional.
How Hernandez Plumbing Can Help
When temporary fixes fail, Hernandez Plumbing steps in with expert solutions. Serving Miami, FL, they offer 24/7 emergency services, so you’re never stuck waiting for regular business hours when a plumbing issue escalates unexpectedly.
Their licensed technicians use advanced tools to pinpoint hidden leaks, whether they’re behind walls, under concrete slabs, or buried in underground pipes. If you’re dealing with recurring problems, they specialize in cast iron pipe and water line replacements to provide a lasting fix. They also handle water heater services, addressing leaks caused by aging or faulty systems.
With Hernandez Plumbing, there are no surprises – thanks to their upfront pricing policy, you’ll know the cost before work begins, even for emergency calls. Plus, they back their work with a satisfaction guarantee, giving you peace of mind.
Need help now? Visit plumbinginmiamifl.com to take advantage of their diagnostic services for just $49 (regularly $97) and get the permanent solution your plumbing problems require.
Take Quick Action on Water Leaks
Water leaks need immediate attention to avoid expensive damage and keep your home safe. When water is escaping, every second matters. The quick fixes mentioned here – like pipe clamps, waterproof tape, epoxy putty, and emergency patches – can help you control most leaks temporarily until a professional can step in.
Before attempting any of these fixes, make sure to shut off your main water valve and steer clear of any electrical hazards. These temporary solutions are just that – temporary. Pick the right fix for your specific leak: clamps work well for straight pipes, while tape is better for joints. These methods are designed to hold things together until permanent repairs can be made.
If your DIY efforts aren’t enough, Hernandez Plumbing is here to provide long-term solutions. Their licensed technicians are available 24/7 for emergencies, offering advanced leak detection to pinpoint even hidden problems. Plus, with upfront pricing and a satisfaction guarantee, you’ll know exactly what to expect before any work begins.
Don’t let a minor leak spiral into a major issue. Use these temporary fixes to buy yourself some time, but trust the professionals to deliver the lasting repairs your plumbing system needs to stay dependable for years to come.
FAQs
What can I do if my main water valve is stuck and won’t turn off?
If your main water valve is stuck and refuses to turn off, start by applying penetrating oil to the valve. Let it sit for a while to give the oil time to work its magic. Once it’s had a chance to settle, gently move the handle back and forth to see if it loosens up.
If that doesn’t do the trick, you can carefully use pliers to turn the handle or adjust the packing nut located just behind it. Be sure to apply light, steady pressure to avoid causing any damage.
Still stuck? Try loosening the nut above the knob and applying more penetrating oil. If none of these approaches work, it’s time to call in a professional plumber. For those in Miami, FL, Hernandez Plumbing offers 24/7 emergency services to tackle plumbing issues quickly and effectively.
How can I tell if my temporary water leak fix isn’t working and needs professional help?
If your quick fix for a water leak isn’t cutting it, you might start seeing water stains that won’t go away, damp patches, or even puddles forming near the problem area. You might also hear dripping or hissing sounds, which are telltale signs the leak is still active.
Keep an eye out for other red flags like rusty or corroded pipes, buckled or warped surfaces, or fresh water droplets appearing. If these problems stick around, it’s a clear sign you need to bring in a professional plumber to stop further damage and ensure the issue is resolved for good.
What are the best temporary fixes for leaks in copper or PVC pipes?
When it comes to temporary pipe repairs, the best method depends on the type of pipe you’re dealing with. For copper pipes, a combination of high-quality rubber or silicone tape and stainless steel clamps can work wonders. These materials create a tight seal and complement copper’s strength and resilience.
For PVC pipes, plastic clamps or slip couplings are a go-to option. They’re simple to use and designed to fit snugly around plastic pipes, making them an easy and effective short-term fix.
Another handy solution for both copper and PVC pipes is epoxy putty. This quick-setting material can seal leaks effectively until you can arrange for a permanent repair. That said, these fixes are strictly temporary. For a lasting solution, it’s always best to call in a professional plumber. If you’re in Miami, FL, Hernandez Plumbing specializes in expert leak repairs to keep your plumbing in perfect working order.
Need Professional Help?
Our licensed plumbers are ready to help with your leak detection needs.